Tuesday, December 30, 2008

Red Lentils with Cauliflower and Potatoes


Simple, satisfying, stick to your ribs dish. Especially when served with a blend of hearty wild rices on the side. Meat is strictly optional as is spice content.

Red Lentils with Cauliflower and Potatoes
1/2 medium onion, small dice
3 cloves garlic, minced
2" piece of ginger, peeled and minced
4 cups of water
1 red potato, medium dice
1 medium carrot, medium dice
2 cups (or 2 hand fulls) cauliflower florets
1 cup red lentils, uncooked
1 tsp smoked paprika
2 bay leaves
salt and pepper to taste
2 Tbsp heavy cream (optional)


In a medium to large sauce pan, saute onion in 2 Tbsp of oil over medium heat until tender. Add the garlic and ginger and continue cooking until aromatic, stirring occasionally.

Add the water, potato and carrot. Increase heat to high and bring to a boil, reduce to a simmer and stir in the lentils, bay leaf and paprika. Season with salt and pepper, cover and reduce heat to medium-low. Continue cooking for about 10 minutes , stirring occasionally to be sure the lentils are not sticking to the bottom of the pan.

Add the cauliflower and finish cooking the dish, covered, for another 5-10 minutes. Remove from heat and stir in 2 Tbs of heavy cream.

Sunday, December 28, 2008

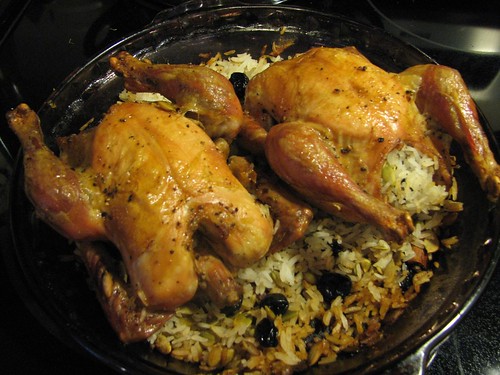
Roasted Cornish Hens with Jasmine Rice, Cherries and Pepitas


Crispy skin, juicy meat, fragrant aromatic stuffing... what more could you want?

Roasted Cornish Hens with Jasmine Rice, Cherries and Pepitas
2 Cornish hens, trimmed of excess fat and rinsed
½ cup dried cherries
½ cup pepitas or pumpkin seeds
1 tsp vanilla
1 cinnamon stick, broken in half
2 cups of COOKED jasmine rice
4 bay leaves
salt and pepper


Season hens with salt and pepper and place 2 bay leaves into the cavity of each hen. Drizzle with olive oil and bake at 400 degrees for 45 minutes to 1 hour.

Remove hens from oven and let cool slightly. Drain off the liquid from the hens and RESERVE about ¼-1/2 cup.

Meanwhile combine the cooked rice, cherries, pumpkin seeds, vanilla nd cinnamon stick with ¼ cup of the roasted hen juices.

Fill each bird with the rice mixture after the hen’s have cooled enough to handle. Put the remaining rice into the baking dish, with the stuffed hens on top.

Return to the oven and bake at 400 degrees another 20-30 minutes.

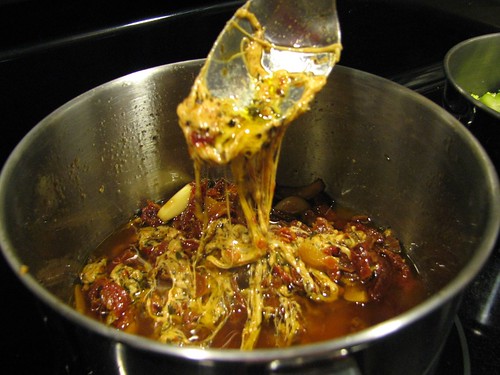
Fresh Mozzarella and Sun-dried Tomato “Fondue”


This dip-style-dish hit the pinnacle of flavor maybe 4 hours after it was composed. OK, well, really it was good after about 30 minutes after the garlic had a chance to soften, but it really held up well over time and got progressively gooey over time.

All of the ingredients, including a ton of black pepper and really good quality evoo went into a pot which melded together on “low” and eventually “warm.” After 4 hours we had a “fondue” of sorts, perfect for scooping with crusty sliced ciabatta bread.

Don’t get me wrong; prior to the six hour mark, it was a WONDERFUL appetizer with soft, gooey mozzarella balls infused with tons of flavor from the sun dried tomatoes, garlic, and thyme.

This is one dish where the quality of your ingredients will have an impact on the outcome of the dish. It would be just as good in one of those mini-crock pots too.

Fresh Mozzarella and Sun-dried Tomato “Fondue”
¼ cup oil-packed sun dried tomatoes, julienned
6 cloves of garlic, cut into thirds
2 Tbsp fresh thyme
2 cups fresh mozzarella balls (small) or cut large balls into 1-2” pieces
¼ cup extra virgin olive oil
salt and freshly cracked black pepper to taste


Combine all ingredients except the cheese in a medium sauce pan. Heat over medium-high heat until oil begins to simmer. Reduce heat to “low” or “warm” and add the cheese. Allow to marinate for at least 20 minutes prior to serving. The longer it cooks the “gooier” the cheese will become.

Saturday, December 20, 2008

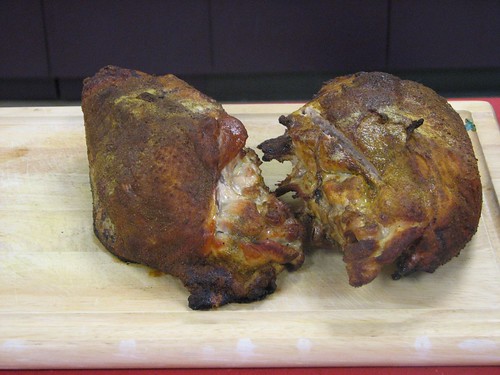
Smoked Turkey


Sexy huh? Yeah you know you want it. This was super easy too. The hardest parts were watching the grill to make sure we didn't have flare-ups, and waiting for my mom to show up for dinner so we could tear into this bad bird.

This was a two part process. In part one, the day before we brined the turkey in a large pot. I combined 1 cup of sugar, 1 cup of salt, 1 head of garlic cut in half, a handfull of black pepper, and several sprigs of fresh tyme in a pot on the stove. Heated that up to combine the flavors, then dumped it in a huge pot that I have follwed by tons of ice to cool it down. Once it was cold, I submerged my whole, washed turkey, breast down (or head first) into the pot and set THAT into a cooler and set the whole shebang outside b/c it's freezing (literally out there). If you don't have a pot that big, you can use your cooler to brine. Just make sure it goes into a cool place (not necessarily freezing, but definitely not like 80 degrees and full sun, you know what I mean?).

That was about 9 p.m. on Wednesday. Around 11 a.m. on Thursday we fired up the grill with equal parts charcoal briquettes (to keep the fire burning) and hickory wood pieces soaked in water for about 10 minutes. The bird came out of the brine, was split in half and went skin side down onto the grill. We closed the top (but kept the air holes open) and if the fire got too hot, added more wet hickory, and if the fire got too cold, opened up the lid and let the fire breathe. We did this for about four hours and then pulled the bird off of the grill and let it sit... and sit... and sit some more unitil Mom showed up and then we got our serious grub on!

The turkey was outstanding. Smokey and delicious. And one thing about smoked meat is that it keeps well for a long time. So there's no shortage of smoked turkey and smoked turkey parts for greens, sandwiches and fritattas in the days to follow.

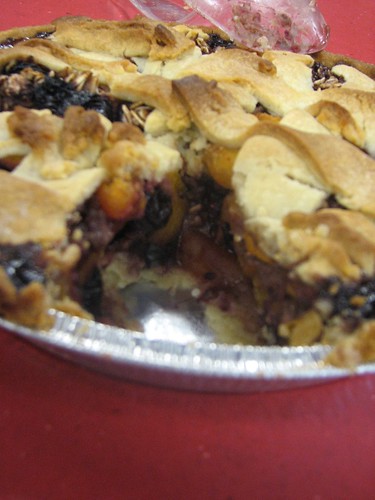
Peach-Cherry Crumble Pie


I've combined two of my favorite parts of dessert, the crumble and the crust and put them together in a low sugar dessert featuring ripe frozen fruits. This is the easiest dessert on the planet and it's bolstered by heart-healthy oats to boot.

Peach Cherry Crumble Pie1 pound frozen peaches
1/2 pound frozen cherries
3/4 cups 5 minute oats
2 frozen pie shells
1 Tbsp. ground cinnamon
1 Tsp. ground ginger
1 Tsp. ground allspice
2 Tbsp. unbleached sugar, honey or agave nectar
pinch salt(optional)
butter (optional)


Combine peaches, cherries and oats in a bowl while they thaw.

Meanwhile heat oven to 350 degrees. Prick the bottom of one pie shell with a fork and bake at 350 for 5-10 minutes. While that's par-baking, cut the other pie shell into strips or chunks to cover the top of the other pie (the more hodge-podgey it is, the more it looks homemade).

Remove pie shell from the oven and let it cool slightly. Meanwhile, add the spices and sweetener to the fruit mixture and combine well. Pour fruit into the par-baked pie shell, top with the other pie shell strips and bake for 20 minutes.

Remove from the oven, and dot with butter if desired. Allow to set for 10 minutes before slicing.

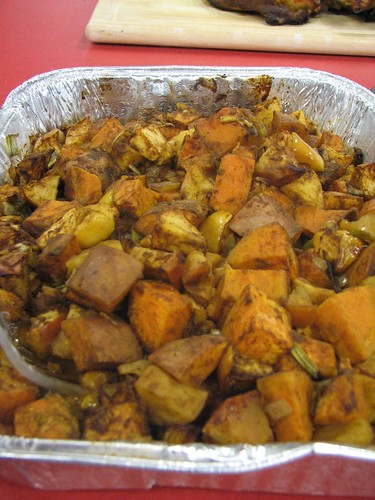
Spiced Sweet Potatoes with Apples


In the south, where I'm from, sweet potatoes show up one way during the holidays: beneath a layer of bruleed marshmallows and swimming in butter. It's a wonderful tradition, but sometimes it's nice to take a fresher approach to sweet potatoes.

In this recipe we combine them with another fruit of the fall harvest: apples. Pick your favorite seasonal apples to go in this side dish. Sweet Gala apples work just as well as tart Granny Smiths, though their attributes do change the dish. Feel free to follow you bliss on this easy side dish that takes care of itself in the oven.

Notice I leave the peels on the sweet potatoes and apples. Keeps the nutrients in the dish and adds some fiber.

Both honey and agave nectar have a lower glycemic index rating than sugar, so the touch of sweetness that is added is safe for most people, including diabetics.

Turmeric, cinnamon, ginger and cayenne pepper all have wonderful health benefits for people battling diseases such as diabetes, hypertension and cancer. Learn more at the World's Healthiest Foods Website.

Spiced Sweet Potatoes with Apples
4 sweet potatoes, scrubbed and diced
4 apples, scrubbed and diced
1/2 curried pecan pieces (pecans toasted with curry powder)
1 Tbsp. cinnamon
1 tsp. cayenne pepper
1 tsp. turmeric
1/2 tsp. nutmeg
2" piece ginger, peeled and grated
2 Tbsp. unbleached sugar, honey or agave nectar
salt and pepper
(Butter is optional in this dish. It adds richness, but it also adds fat and calories.)


Combine all of the ingredient is a roasting pan or large baking dish.

Bake at 400 degrees for 15 minutes, then turn the pan.

Cook for another 10 minutes and test for doneness by piercing a piece of sweet potato. It should give easily and not be crunchy, however, you do not want to cook this dish to mush. The sweet potatoes and apples should retain their textures and flavors.

Spice Rubbed Turkey Breast


During the holidays it's easy to got leftover overkill. One solution I've found is to cook turkey breast instead of the entire bird. With this delicous spice rub, which I've used in the past for grilling and on pork, turkey packs a lot of flavor that is still complimented by traditional holiday dishes such as cranberry sauce, sage dressing and green bean casserole. I've used the spice rub on boneless/skinless turkey breast (done in less than 20 minutes) and here on a split breast, bone in, skin on. Cooking meat on the bone helps to keep is juicy and the skin gets crispy and yummy, like turkey cracklin'! MMMMMM.

Spice Rubbed Turkey Breast
1 turkey breast, split, bone-in, skin on
1 tsp. Garam Masala
1 tsp. Cumin
1 tsp. Turmeric
1 tsp. Cayenne Pepper
1 tsp. Grround Garlic
1 tsp. Ground Cinnamon
1 tsp. Ground Ginger
1 tsp. fresh Thyme
Salt and Black Pepper

Rinse and pat dry the turkey and set on a rack in a roasting pan.

Combine all of the spices except salt and pepper. Sprinkle liberally on all sides of the turkey, reserve any leftover rub for a future use. Season the turkey on all sides with salt and pepper.

Roast turken in a 400 degree oven for 10 minutes. Reduce heat to 350 and continue cooking until the turkey is done (juices will run clear - or if you're lucky you'll have a pop up timer in one of the breast lobes!). Depending on the size of the turkey breast that could be another 10-20 minutes.

Remove from oven, cover with a foil tent and let sit for 10 minutes before slicing so that the meat stays juicy.

Hearty Whole Grain Stuffing/Dressing

Some people call it stuffing, some people call it dressing. I call it yummy, especially when loaded with gravy! This dressing is made with the heartiest whole grain bread you can find, and what I call "real" corn bread made from simple ingredients: corn meal, water, eggs, honey, touch of vegetable oil. From these two seemingly dry and hostile bread sources comes a wonderful dressing that is loaded with contrasting nutty, sweet, spicy flavors and fiber and heart-healthy whole grains. Can't beat that during the holidays!

Hearty Whole Grain Stuffing/Dressing

1 loaf of all natural hearty whole grain or multi-grain bread
1 loaf of cornbread
2 cups of chicken stock, water or vegetable stock
1/2 cup dried figs, sliced and reconstituted in 1 cup of hot water
3 apples diced (peeling is optional but you lose some nutritiants when you peel them)
1 tsp. ground cayenne pepper (or more to taste)
1 tsp. ground cinnamon (or more to taste)
1 tsp. all spice (or more to taste)
1 medium onion, diced
salt and pepper
1 Tbsp fresh thyme
Spiced Nuts (1/2 cup pecans or almonds, sliced or pieces, toasted with garam masala, cayenne pepper, cumin and salt)

In a large bowl, break up the breads (or cut into 1-2" cubes), season with salt and pepper and add onion, thyme and cayenne pepper.

In a separate medium sized bowl, combine figs, appples, cinnamon and all spice. Add the apple mixture to the bread mixture and gently stir ingredients together because you don't want to break up the bread too much.

Add stock or water until the bread is thoroughly moistened. There shouldn't really be excess liquid that the bread hasn't absorbed.

Bake in a 400 degree oven for 20 minutes. Check about 10 minutes in to see if you need to add more liquid. The center of the dressing should be moist but not gooey when done. Top with toasted Spiced Nuts and serve.

You can add butter to the dressing as well for added richness.

Sunday, December 7, 2008

Lamb Stew with Smoked Paprika and Lemon

I finally got a hold of some Spanish smoked paprika. It’s been on my list for a while and either I’d forget to look for it when I went to the market, or it wasn’t there when I did remember to look for it. It’s the secret ingredient lending depth and character to this yummy lamb stew.

1.5-2 lbs lamb meat for stewing
1 medium yellow onion, diced
2 medium carrots, diced
3 cloves garlic, minced
3/4 cup tomato sauce
3/4 cup red wine
3/4 cup chicken stock
1 can chickpeas, drained and rinsed
2 tsp smoked paprika
2 Tbsp fresh thyme, minced
1 Tbsp fresh rosemary, minced


In a pot heat 2 Tbsp oil over medium high heat. Season lamb with salt and pepper and brown on all sides in the pot. Remove the meat from the pot and set aside.

Drain off all but 2 Tbsp of fat in the pot and return the pot to the heat. Add the onions and carrots and sauté a few minutes until the onions start to become tender. Add the garlic and thyme and continue cooking until the garlic begins to brown.

Add the tomato sauce, wine and chicken stock, and stir in the paprika, more black pepper and chick peas.

Return the lamb to the pot being sure that the meat is covered by the broth. Add rosemary, cover and simmer on medium-low heat for 45 minutes or until the meat is tender and begins to fall off of the bones.

NOTE: The cooking time will be determined by the thickness of the meat, and whether or not you use mean on or off the bone.

Taste to correct seasoning before serving. Spoon stew into individual bowls, and op each bowl with a sprinkling of grated lemon zest. Serve with crusty bread.

Monday, December 1, 2008

Life Chef News and Dates

Happy Holidays everyone!

Hopefully by now you've had a chance to check out my audition video for the Next Food Network Star: Season 5. Here's the link: http://tinyurl.com/lifechef Please take a moment to view the video again and feel free to leave comments. I have a sneaking suspicion they are keeping an eye on the number of views the videos get, and I'd love to stay in the "Most Viewed" category. With that said, save the link to your favorites and please visit often, just to say "hi." Many of you have asked for an update, and as soon as I hear something new from the Food Network, I'll let you know. For now I'm excited and hopeful to still be considered for the show because I know I have what it takes to bring my Life Chef message of easy, delicious and healthful eating to the viewers of the Food Network. Not to mention, I'll have a fantastic time doing it... and you know this! So please spread my message of healthy eating to friends and family near and far and ask folks to check out this link to my audition video: http://tinyurl.com/lifechef Thanks again for all of the support, encouragement and prayers!
--------------------------------------------
In other Life Chef News...

Catch me, your Life Chef Asata Reid at these upcoming dates:
Dec. 4, Worksite Wellness Healthy Cooking demo at Clayton County
Dec. 17, Healthy Holiday Hors D'oeuvres at the Atlanta Fulton Public Library
Jan. 13, Eating for a New Year at the Saturday Academy at the Hillcrest Church of Christ

The 2008 Calendar for Life Chef Classes at Saint Philip AME Church and Sevananda Natural Foods Market will be released soon so stay tuned...

Holiday Recipes
I was very busy with holiday recipe classes in October and November and try as I might, I was unable to get all of those yummy recipes and photos uploaded before Thanksgiving. However, make sure you visit www.lifechef.net in the days to come because I will definitely get those recipes from the classes and more up in time for your Christmas, Kwanzaa, New Years entertaining! I hope you have as much fun cooking and eating these tasty renditions of holiday classics (minus some of the fat and sodium).

Monday, November 10, 2008

The Next Food Network Star


Many of you have suggested that I should bring my Life Chef message to the Food Network, and now I've thrown my hat in the ring to be the Next Food Network Star.

Check out my audition video at http://www.foodnetwork.com/the-next-food-network-star-season-5/package/index.html and then look around page one or two of Most Viewed (it moves around a lot so I can't give you a specific link. Sorry, I've tried and it just causes confusion!).

Please take the time to leave a comment and forward the link to anyone you know who watches the Food Network... or simply loves food!

Thanks for your support!

Wednesday, October 1, 2008

New from Life Chef

Check out these upcoming classes and events!

NF102: Food as Medicine Class Sat. Oct. 4

The Natural Foods Series continues at Sevananda Natural Foods Co-Op on Saturday Oct. 4 with Natural Foods 102: Food as Medicine. Join me, your Life Chef Asata Reid, and learn more about the healthful properties of food as we discuss some of the latest findings in science and medicine that support a natural foods diet. Taste for yourself how good "medicine" can be!

For this class we'll be focusing on "Good Fats" that are derived from plants. What are "good fats"? What vegetables and oils are high in good fats? What YUMMY preparations can we enjoy in moderation that feature these good fats? Come taste for yourself!

This class is from 10 a.m. to noon, at Sevananda Natural Foods Co-Op. As a service to the community service, this staff training class has opened to the public for $10. Please pay at customer service and proceed downstairs to the classroom. For more information call (404) 681-2831.

*********************************************
Women's Wellness Workshop Sat. Oct. 11

Womens' Wellness Workshop
Saturday October 11, 11:30 a.m. - 1:30 p.m.
$20/person
This cooking demonstration and wellness workshop discusses various illnesses affecting women at all stages of life. Learn how certain foods, herbs and spices can positively affect your mood and fight illness and the side affects of disease. In addition to taste-testing different foods, you will walk away with screening information and resources to assist you with identifying and managing disease and illness. The presenters for this workshop are Staycee Benjamin-Stone, a preventive care specialist; and Asata Reid
from Life Chef.

Please register online at www.aymfitness.com or call 678-749-7777 by Friday Oct. 3.


AYM Fitness and Dance Studios is located at 4051 Stone Mountain Hwy, Suite G101B in Lilburn, GA 30047 in the Publix Shopping Plaza at the intersection of Hwy 78 & Killian Hill Road. For more info call 770.921.5424.

*********************************************
Healthy-ween at Saint Philip AME Sat. Oct. 18

Do the sugary sweets of Trick or Treating scare you? Take the fear out of Fall Festivals with the nutritious and delicious treats that kids will love to make AND eat. Children and parents will enjoy making these spooky snacks with wholesome ingredients:
* Spaghetti and Meat-Eye-Balls
* Buggy Cider
* PB&Jack-o-lantern
* Fruity Mummy Eyes
* Cheese Fingers
* Ghost Toast

The Healthy-ween class will take place Oct. 18, form 10 a.m. to noon. For more information, call Life Chef Asata Reid at 404-513-6468


*********************************************

Healthy Holidays at the Warm Springs Institute for Rehabilitation Thurs. Oct. 16

Join Life Chef and the Post-Polio Support Group as they open their doors to one and all on the beautiful campus of the Warm Springs Institute for Rehabilitation on Thursday Oct. 16 for a delicious Healthy Holidays class.

This wonderful class will be filled with the nostalgic aromas of holidays of the past. We'll enjoy healthfully recreated traditional dishes with less fat, salt and refined ingredients. The Post-Polio Support Group has generously invited the community and folks managing long-term or chronic conditions to benefit from this wellness knowledge for a healthy and happy holiday season.

This Healthy Holidays class will take place from 11 a.m. to 1 p.m. in the old hospital, 3rd floor on the campus of the Warm Springs Institute for Rehabilitation, in Warm Springs Georgia. For more information, call Life Chef Asata Reid at 404-513-6468.

*********************************************

Corporate Calendar

Do you work here (or know someone who does)? If so, be sure to check out a Life Chef Demonstration coming your way soon!
10-6 Pepsico-Quaker Oats (S. Atl.)
10-8 Ikon (Macon)
10-15 Verizon (Alpharetta)
10-17 Verizon (Alpharetta)
10-23 Henry Co. Govt (McDonough)
11-4 Heidelburg USA (Kennesaw)
11-5 Coca Cola (Atl.)
11-20 Verizon (Alpharetta)


*********************************************
Class Review

Our Shop & Cook class with Saint Philip AME at the East Lake Publix on Sept. 27 was a great success. While this class didn't focus on cooking as much as shopping we still shopped and planned for three healthy meals, as well as the rest of our shopping list, and found new territory inside of the grocery store complete with great time-saving ingredients and healthy alternatives. We then prepared two complete meals (one to eat and one to refrigerate or freeze) in 25 minutes! A great class, all in all.
Testimonials include:
"I learned a lot. This will save a lot of time."
"I'll definitely be using this list to organize my shopping."
"I saw ingredients I've never seen before. I've just been walking right by them!"


Thanks to the Publix for letting us peruse their shelves, thanks to The Champion newspaper for coming out to cover this community event, and thanks to everyone who attended the class for making it such a great success.

Wednesday, September 24, 2008

Mahogany Wild Rice Salad with Lemon Vinaigrette


This is an excellent side for grilled fish or chicken, or add tofu for a complete meal.

1/2 c. wild rice, cooked and chilled
1/2 c. grape tomatoes halved
1/2 c. cucumber slice and peeled
1/2 c. scallions, thinly sliced
1/3 c. olive oil
1/4 c. lemon juice
2 tsp. fresh parsley leaves
1/4 tsp. pepper


1. Cook wild rice according to package directions and allow to cool.

2. Whisk together oil, lemon juice, parsley salt and pepper in salad bowl. Add tomatoes, cucumbers, scallions and rice.

3. Stir gently to combine all ingredients.

4. Allow to sit and chill for at least 10 minutes. Serve chilled or room temperature.

That Cookbook You've Been Putting Off...

Attention all cooks and chefs:

I know you've been toying w/ the idea of putting together a cookbook. And either you're too busy, too over-committed, intimidated or lazy (or some combination of the four) to get it done.

I've found a gorgeous, inexpensive, professional looking alternative to doing all of the work yourself. It's called TasteBook.

I just started mine last night with only one recipe, but it was enough for me to see that this could be a great gift, family heirloom, or goldmine in the right hands. Check it out here: My First TasteBook

So get all your recipes and/or photos together (don't have photos? they'll provide some gorgeous food shots) and get busy making your first cookbook happen. No more excuses.

Tuesday, September 23, 2008

Shop & Cook Meal Planning Class this Saturday!

This class has been in high demand for some time now, so DON'T MISS OUT!

The Shop & Cook class will show you how to:
* quickly and efficiently plan your week's shopping and meals
* shop like a pro with minimal waste and optimal flavor and nutrition
* prepare a meal for immediate consumption, prep a meal for quick assembly later in the week, and prepare a frozen meal to be eaten at your convenience
* support a healthful diet by stocking your pantry and freezer
* use many more time saving tips that will help keep you eating well!


Whether you're cooking for yourself or a family of five, this is THE class you've been waiting for. Make shopping a breeze, and drop the burden answering of "what's for dinner?" with this Life Chef Shop & Cook session!

This is healthful and time-saving information you will use again and again and again!

This class will meet to for the "Shop" part of the class at the Publix at East Lake at 10 a.m. and retreat just up the street to the Youth Cafe at Saint Philip AME Church for the "Cook" part of the class.

Don't miss this class! For more information, call 404-513-6468. This class is from 10 a.m. - noon, Saturday Sept. 23, 2008. The class is $15 per person, with a seniors' discount for people over 55 years old.

Publix at East Lake
2235 Glenwood Ave SE
Atlanta, GA 30316-2319

Saint Philip A.M.E.
240 Candler Road
Atlanta, GA 30317
*********************************************
NF102
The Natural Foods Series continues at Sevananda Natural Foods Co-Op on Oct. 1 with Natural Foods 102: Food as Medicine. Come learn more about the healthful properties of food as we discuss some of the latest findings in science and medicine that support a natural foods diet. Taste for yourself how good "medicine" can be!

This class is from 10 a.m. to noon, at Sevananda Natural Foods Co-Op. As a community service venture, this staff training class has opened to the public for $10. Please pay at customer service and proceed downstairs to the classroom.

*********************************************
Women's Wellness Workshop

Womens' Wellness Workshop
Saturday October 11, 11:30 a.m. - 1:30 p.m.
$20/person
This cooking demonstration and wellness workshop discusses various illnesses affecting women at all stages of life.

Learn how certain foods, herbs and spices can positively affect your mood and fight illness and the side affects of disease.

In addition to taste-testing different foods, you will walk away with screening information and resources to assist you with identifying and managing disease and illness.

The presenters for this workshop are Staycee Benjamin-Stone, a preventive care specialist from Kaiser Permenente; and Asata Reid from Life Chef.

AYM Fitness and Dance Studios is located at 4051 Stone Mountain Hwy, Suite G101B in Lilburn, GA 30047 in the Publix Shopping Plaza at the intersection of Hwy 78 & Killian Hill Road. For more info call 770.921.5424.
*********************************************

Thursday, September 18, 2008

Women's Wellness Workshop

Hey folks!
I wanted to let you know about this fantastic workshop that's coming up in October. I hope to see you there!

Womens' Wellness Workshop
Saturday October 11, 11:30 a.m. - 1:30 p.m.
$20/person

This cooking demonstration and wellness workshop discusses various illnesses affecting women at all stages of life.

Learn how certain foods, herbs and spices can positively affect your mood and fight illness and the side affects of disease.

In addition to taste-testing different foods, you will walk away with screening information and resources to assist you with identifying and managing disease and illness.

The presenters for this workshop are Staycee Benjamin-Stone, a preventive care specialist from Kaiser Permenente; and Asata Reid from Life Chef.

Sunday, September 14, 2008

Griled Stone Fruits with Balsamic Glaze & Vanilla Ice Cream

Talk about flexible! This dessert can be remade any number of ways. Stone fruits are fruits with a pit: plums, apricots, peaches, pluots. But pears or apples are any number of semi-firm fruits could work in this dessert. Even grapefruit!

And what a great way to use fruit toward the end of BBQ Season. Of course if the weather is nasty, you can always grill the fruit on a grill pan, in a pan or on a griddle.

Just remember the secret ingredient: butter. Yep, good old fashioned butter will give you a nicer carmelization that oil, in my humble opinion, but using oil or even cooking spray will still get the job done.

For this desert I used apricots, plums and pluots (cross between a plum and an apricot), about 4 each. That could serve anywhere about form 4-12 people depending on how you dish it up.

Grilled Stone Fruits with Balsamic Glaze & Vanilla Ice Cream
12 pieces of fruit, pitted and halved
butter, oil or cooking spray
10-12 oz of balsimaic vinegar
2 Tbsp raw sugar
1 generous pinch of black pepper

Saturday, September 6, 2008

Plantain Fritters


This was a fun recipe using deep frying "technique." We went at it blindly, without any research as if plantain fritters had never been made before. We also had a specific flavor profile in mind: mojo. The goal was to blend the starchy sweetness of the plantains with the citrusy tang and garlicky pungency of mojo -- a marinade associated with yummy Cuban flavors. Usually plantain get a sweet treatment, versus savory, with the addition of cinnamon, sugar, allspice and the like. We relied on some garam masala, cumin, cayenne, tons of garlic, fresh onion and lime juice to give these fritters zing, spice and depth of flavor.

We went to the DeKalb Farmer's Market and gathered 4 plantain -- a cousin of the banana -- from the bottom of the pile. While they looked a little bruised and dingy yellow, I thought they were the perfect ripeness for these fritters. As plantain ripen, they darken and the black plantains that would get tossed if they were bananas are the sweetest and softest.

Still, I wanted them to still be fairly starchy -- plantains can be almost potato like when they're barely ripe and at that point they're perfect for tostones, but I wanted to feel them give a bit when I squeezed them so that hopefully the ripening was underway and the sweetness was developing.

Also, after we got started, we learned that most plantain fritter recipes call for cooking the plantain first. We managed to circumvent this step by making small fritters, like bite sized hush puppies, by using a common teaspoon and dropping them into our Fry Daddy to deep fry them until they floated. As a note on technique, they do need to cook on both sides for even frying so be prepared to roll these little boogers over unless you make them really small.

The only other hardware we used was the food processor. If you don't have one, you can make small batches in a blender, or you can probably process this the old fashioned way with a potato masher or grater.

Finally, it was important that the plantain fritters had enough flavor to stand up on their own because they were the side to some Lime Ginger Grilled Amberjack with a salsa fresca. There was no dipping sauce except perhaps for the lime and olive oil drizzle from the salsa. I wanted these fritters to be good enough to eat without a dip or sauce, which would make the simple accouterments of cilantro leaves, sliced onion and a squeeze of fresh lime that more fantastic, fresh and flavorful.

Wow that's a lot of info if you don't know what a plantain is, much less mojo or tostones, so I've put links in along the way for you to learn more. I'm very happy with they way these turned out. We fried up four batches... and ATE four batches. We've stored the remaining batter in the fridge for future use and it seems to hold up well. I recommend freezing it if you're not going to get back to it within three days.

Plantain Fritters
4 medium-ripe plantain, peeled and sliced
6 cloves of garlic, chopped
1/2 medium onion, chopped
juice from 1 1/2 lime
1 Tbsp olive oil
1/4 tsp baking soda
1 Tbsp garam masala
1 tsp cayenne
salt, pepper

Combine all ingredients in a food processor and blend, stopping occasionally to scrape the sides and incorporate chunks. Blend until a smooth pasty consistency.

Meanwhile heat oil in a fryer or deep pan until 350-375 degrees.

Using a kitchen teaspoon (not a measuring spoon unless you want them that small), carefully drop spoonfulls of batter into the oil. Allow to fry for a couple of minutes then carefully shake your fryer basket or use a spoon to help release the fritters from the bottom of the pan or fryer basket if they happen to stick.

As the fritters begin to float, roll them over so they can cook on both sides. After a total of about 6-7 minutes they should be done.

Remove one from the oil and allow to drain on a plate covered with paper towels. Break it open with a fork (careful it's hot!) and make sure the fritter is cooked. If so remove the remaining batch and allow to drain. If it's not done, continue cooking the fritters another few minutes and adjust your overall cooking time.

Wednesday, September 3, 2008

Parsley: to stem or not to stem


Thanks to Robert-Gilles, a Frenchman living in Japan (oh we MUST talk!), I'm reminded that I meant to address the use of pretty much the entire parsley bunch in my latest video. A pop up, well pops up, that addresses whether or not you should stem parley. By "stemming" it I mean picking the leaves off of the stems before cutting up the herb. If you've watched the video then you know I didn't stem the part I used.

I say this as a golden rule above all others when cooking: use your instincts. Follow that with your senses: sight, smell, taste, texture. And finalize your decision through the filter of common sense. That applies to every dish, every time. But back to the parsley...

This bunch of Italian (flat leaf) parsley was very verdant and lovely. The leaves burst forth virtually from the base of the bunch, and it wasn't long or "leggy" which herbs tend to be as they grow older. In other words, this was a fresh, young bunch of parsley and it had an amazing color and aroma. I remember it made a distinct impression while I was cutting it, and I am soooo tempted to attribute the perfection of this parsley to its ORGANIC origins. You'll notice that I diced it up pretty fine, although I was aware that in a dish like this, the crunch from tiny bits of stem would actually be a welcomed contrasting texture, and made the conscious decision to utilize both the leaves and the stem up to the point where the leaves began to grow out. That was my choice, and tasting the dish, I'm happy with it.

When NOT to stem:
Thinking holistically, and in the vein of minimizing waste, using the entire herb is a no-brainer. Also from the Food as Medicine stream, we benefit from ingesting as much of an edible herb as possible, and in the case of parsley, as often as possible. Some herbs and plants have tender stems up where the leaves are, and you'll find this in baby or young greens as well. I don't necessary stem or "vein" my young turnips or kale. Depending on the dish, I don't always stem basil up at the very top where the tiny leaves make florettes (I admit that I enjoy eating basil florettes, though everyone might not). Again, this is one of those choices that comes from knowing your ingredients, knowing the outcome that you're shooting for, and using your senses (including the common one) to determine your next move.

Still as a professional chef, I gotta tell you, there are times when you won't want to use the entire herb.

When to stem:
~If you're making a dish that doesn't benefit from texture, then definitely stem your parsley. Also be sure to cut a very fine dice or perhaps even a chiffonade if you're going to circumvent the dare-I-say? toughness that parsley can bring to the dish.
~If you have a good use for the stems, like say you're making some stock or soup in the very near future, or you plan to steep the stems like tea for a medicinal concoction.
~If you're making a garnish or something where the chopped up stems will be visible and therefore a distraction to the eye. Of course now we're getting into Food as Art instead of Food as Medicine, the latter of which would encourage you to eat the entire plant for the most health benefits. The aesthetics of what you eat is very important, or can be if you allow yourself to really enjoy your food. This is when food starts to get decadent!
~If you are making a shi-shi frou-frou dish and having hoity toity guests over to eat it. They WILL notice your parsley stems and will think you are either lazy or ignorant for not having the sense to pick your parsley. Which leads me to the last reason (said in jest)...
~If you are working for a French-trained chef. They pick everything. Thyme, parsley, chervil. You got it? You pick it! And you do it quickly and right the first time, and with nothing more than a "Oui chef! Right away chef!" and a skip in your clogs to get it done.

So there you have it folks! The much-longer-than-I-intended answer to whether or not you should pick your parsley. And lest you think I'm being too serious about my food (let's face it, food is what I DO) let me leave you with this thought: You can pick your parsley, and you can pick your nose, but you can't wipe your parsley on the couch!

Monday, September 1, 2008

Kids Can Cook: Roasted Duck Dinner

I'm sure you're well over the "What's for Dinner?" question. I know I've had days where absolutely NOTHING came to mind and I've had to fight the urge to turn to Chef Boyardee. On this particular day though, I drove to the DeKalb Farmers Market with the kids and said, "Pick out something you've never had before." Well that was fun because we ended up with this restaurant quality menu feeding a family of five, for a grand total of $35:

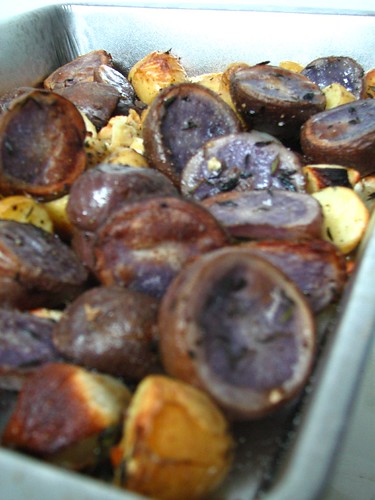
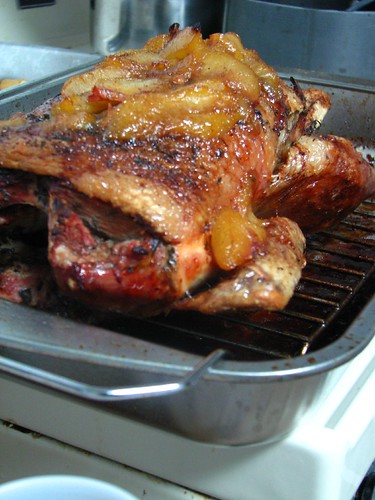
Roasted duck a la pluot with roasted purple and fingerling potatoes and soy glazed long beans.

Sounds fancy, but tasted fantastic. The kids helped with all of the prep and they were talking about this wonderful meal for days to come.

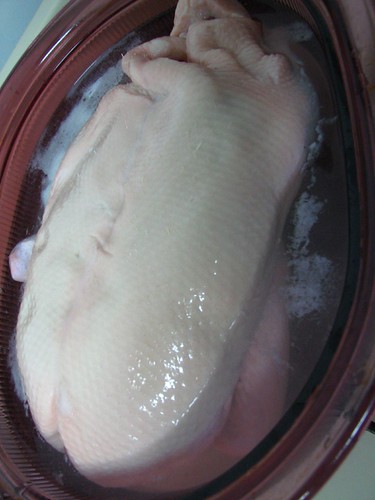
First we "brined" the duck by giving it a salt water bath while we did all the prep. Then we picked the thyme and marjoram from the stem, a perfect job for little 6 year old fingers, as was cutting the tips off of the long beans.

Next we sliced the potatoes into 1" in pieces, something you can definitely trust a 13 year old to do. He also peeled and smashed a couple cloves of garlic (OK more like 6) and peeled and quartered pearl onions. While the kids took care of that portion of the meal, I peeled the pluots (a cross between a plum and an apricot) and put them in a pot with ginger, cinnamon, allspice and touch of turbinado sugar. A lot of spices, but I used a very light hand for each of them.

Now we didn't actually COOK anything up to this point because we had to go get our three year old from daycare. So once we got back, I rinsed the duck, seasoned it with the herbs by sticking them under the skin next to the meat, filled the cavity with a lemon, some garlic cloves and hit the entire bird with fresh black pepper and popped that bad boy in the oven (no need to salt it as it'd been in a salt bath for 3 hours).

Next the potatoes were dressed with a little olive oil, salt pepper and the last of the herbs and they went in after the duck had been in the oven about 30 minutes.

Finally I turned on the pot with the pluots so they could cook down, and heated a large pot of salty water to cook the long beans. Once they were tender, I drained them and dressed them lightly with sesame oil and soy sauce.
Yes they kind of look like long green snakes, but I think that's exactly why the kids like them!

About half of the pluots went on top of the duck during the last 10 minutes in the oven and made a nice fruity glaze over the crispy skin. I saved the rest as a fruity natural topping for toasted waffles or French toast (YUM!)

Was it good? Heck, any time you can get your kids in the kitchen AND get them to eat a meal of whole foods that includes vegetables and "new" foods, you're looking at a success. Not to mention our meal was delicious. That duck carcass looked like a swarm of locusts had picked the bones by the time we were done with it! Who say's kids can't cook?

Stump the Chef: Pine Nuts


I've created the Stump the Chef category because honestly, I get asked questions during classes and seminars that I don't have the answer to, and I'm not so far gone to think I SHOULD know everything. In fact, some of these are down right funny, like this first example -- Pine Nuts -- which seems to be really obvious, but even though I've been using pine nuts for YEARS I never really gave thought as to their source.

Recently at the Healthy Desserts class down in Warm Springs, I got stumped: What are pinenuts? Do they really come from pine trees? Are they indeed a nut?

I'm surprised I didn't know this, but yes, they DO come from pine trees, although they're really seeds, not nuts. Although all pine tree seeds are edible most are too small to make harvesting worthwhile, and most of the varieties we're familiar with come from about 20 different varieties of pine trees. Pine nuts are native to North America, Asia, the Middle East/Mediterranean/North Africa and Europe. American varieties contain less protein than European varieties, but either way all pine nuts contain more protein than any other "common" nut. Asian varieties tend to have more pine flavor, which is all but absent from the seed of the Stone Pine that most cooks are familiar with. For an everything-you-ever-wanted-to-know look at pine nuts click this Wikipedia article.

The harvesting process is interesting and can be messy because you're dealing with unopened pine cones and that sticky tar or "pitch" that comes along with pine trees. Liston Pine Nuts are harvested in Nevada, and they've put out a TON of info about pine nuts, their harvesting and storage with recipes and much more on their website Pinenuts.net.

Pine nuts have a meaty almost creamy texture kind of like a soft cashew but less sweet. They have wonderful mild flavor that is enhanced to a sweet nuttiness when toasted. They have a fairly high oil content so adding them to low fat diet can provide some of that "fat satisfaction" that you may be tempted to acheive from a french fry binge. Instead of reaching for a bag of chips next time you get a salty, fatty craving, top your salad, rice dish or main protein with some toasted pine nuts to give your body what it craves.

If you're allergic to tree nuts, you're probably allergic to pine nuts too. Sorry. They aren't a nut substitute.

Some Life Chef recipes that use pine nuts include Poached Pears with Figs and Greek Yogurt and Summer Greens with Pine Nuts and Lemon.

In many recipes that cause for toasted almonds, pecans or walnuts, try using pine nuts. Store them in the refrigerator if you're not going to use them up immediately. Like many fresh nuts, they can become rancid in warmer temperatures if left out.

I hope that clears up any ambiguity you may have had regarding pine nuts and their uses. I'm still giggling that after all these years I never knew that!

If you have any questions and want to play Stump the Chef feel free to email me. It's a great way for me to keep learning, and a true chef is never "done learnin'."

Monday, August 25, 2008

Poached Pears: 2 Ways


I’ve made this easy fruity, creamy, yummy dessert twice in the past week and in two different forms. I’ll post both because I want you to see how simple this elegant looking dessert is, as well as how FLEXIBLE this dessert can be.

The first time I prepared poached pears it was for a Healthy Desserts class at the Roosevelt Warm Springs Institute for Rehabilitation. This particular Healthy Desserts class had the added challenge of no on-site oven, and when I think of desserts firing up the oven is in the forefront of my mind. Poached Pears were one of three desserts I prepared that day, along with a surprising low-fat and fresh tasting Almond-Raspberry Trifle made with Dark Chocolate fat-free Angel Food Cake, and Grilled Plums & Apricots with Ice Cream and Black Pepper Balsamic Glaze.

Typically poached pears recipes call for wine or port or brandy or liquors like Amaretto or Grand Marnier, but I wanted to make a virgin version for those who are leery of cooking with alcohol, or who abstain for other reasons.

I went kind of Mediterranean for the first version, filling the pears with Greek yogurt and figs, and topping the dessert with toasted almonds and pine nuts.

The second time I made this dish, we shot a video of it over at our cousins’ house. It was a Family Day Sunday and all the kids were playing. I wanted a family-friendly dish, so I sweetened up the filling by using vanilla yogurt scented with cinnamon and vanilla, and fresh strawberries.

The basic four steps of the dish are: 1) poach the pears in a lovely fragrant liquid, 2) toast some nuts, 3) combine yogurt, fruit and spices for filling, and 4) reduce some of the poaching liquid to make a syrup. That’s the short version.

Of course you could poach apples, or any other “hard” fruit. And you could use ice cream instead of yogurt. If you don’t like nuts, leave them off. This dessert is wide open for reinterpretation. If you give it a try, or make up your own, then please email me and let me know how it turns out for you.

A note about pears: some are very tender, some are very hard. Choose a variety of pear that can withstand a good 15 minutes of poaching without turning to mush. This is not the recipe for over-ripe, canned or frozen fruit. However, those pretty green Bartlett pears that are miraculously available 365 days a year will need to hang out in the poaching liquid a good 30 minutes. Those suckers are typically hard and not very juicy. The point of poaching these pears is to get them “fork tender” where you could get a spoon or fork through them in one swoop.

If you over cook your pears: Once the pears are mushy you have two options, both of which benefit from the use of a blender: pear sauce or pear cider.

To assemble the dish: Regardless of which version you try, the assembly of the final dish is simple and pretty. Place a pear in a shallow dish or bowl with the cut side facing up, spoon filling into the cavity and drizzle over the side, top with toasted nuts and drizzle lightly with syurp. Simple, pretty and elegant. Enjoy!

**************************************
Poached Pears with Greek Yogurt and Figs
For the Pears6 Pears
1 cup of honey OR agave nectar OR fruit juice concentrate
½ cup turbinado (raw) sugar or brown sugar
3-4 cinnamon sticks
2 2” pieces of ginger, peeled and grated
juice from 1-2 lemons
1 Tbsp ground cloves
1 Tbsp ground allspice

For Toasted Nuts
¼ cup almonds
¼ cup pine nuts

For Greek Yogurt and Fig Filling
1 – 1 ½ cups dried or fresh figs diced
½ cup of water (for fresh figs) or 1 cup of water for dried figs
1 cinnamon stick
1 tsp allspice
2 Tbsp turbinado or brown sugar
juice from 1 lemon
1 ½-2 cups Greek style yogurt

*******************************************

Poached Pears with Strawberries and Vanilla Yogurt
For the Pears

6 Pears
1 cup of honey OR agave nectar OR fruit juice concentrate
½ cup turbinado (raw) sugar or brown sugar
3-4 cinnamon sticks
2 2” pieces of ginger, peeled and grated
juice from 1-2 lemons
1 Tbsp ground cloves
1 Tbsp ground allspice

For Toasted Nuts
¼ cup almonds, blanched and slivered

For Yogurt and Strawberries
2 pints strawberries, stemmed and quartered
1 tsp cinnamon
1 tsp vanilla extract
1 ½-2 cups vanilla yogurt

Saturday, August 16, 2008

Life Chef Update with Recipes

Hey Y’all! I’ve been a busy girl, so I have a lot of recipes to share with you. Click on the embedded links to see any full recipe. I’ve also put a link in for the first ever Life Chef Video, and at the end I have a list of upcoming Life Chef Classes. If you’d like to have a Life Chef presentation at your church, office or next group meeting please give me a buzz.

Let’s start at the last Natural Foods class held at Sevananda Natural Foods Co-op. There we taste-tested all natural sweeteners like fruit juice concentrate and agave nectar. We also sampled some organic dark and milk chocolates. Finally we simple some milk alternatives: hemp, almond and rice to see first hand what the differences were. The recipe that stole the show was Miso Soba Noodles with Gingered Shiitakes and Nappa Cabbage Slaw. Yum!

Then I had the pleasure of participating in the 4th Annual Wellness Fair at Saint Philip AME Church where we focused on a great lunch and snack time optionin "That's a Wrap!" Wraps travel well, can be made in advance, are an easy and sophisticated choice for older kids to make themselves for school lunches, and are even a great use for leftovers! Adults and kids alike thoroughly enjoyed the Salmon BLT wraps and super-quick and easy Pizza Wraps. The fruit and nut laden Peanut butter, Banana and Honey wraps and the Strawberry Kiwi wraps were a tasty and healthy addition. The turkey and cheese sandwich got a face lift with the Roasted Turkey and Smoked Gouda wrap that also benefited from an easy roasted red pepper mayo. There's another yummy wrap option and a great way to reinvent tuna in the Mediterranean Tuna Wrap.

I returned to Saint Philip for the 25th Annual Health Ministry Annual Breakfast where I prepared a light repast with my sous chef Mr. Patterson. The star of the morning, besides the scholarship awardees and the past and present members of the Health Ministry, was a spinach laden quiche that was so easy to make. I’m putting the Spinach Quiche recipe up because so many people asked about and because it really was just that easy. Loaded with spinach and roasted red peppers, this quiche is relatively light on the eggs, for those watching their cholesterol – maybe 3 eggs per pie crust – however you may substitute 3 egg whites and one whole egg, or even use Egg Beaters instead of whole eggs.

The good folks at Piedmont National Corp. and Henry County were my next two stops during the week as I conducted Healthy Cooking classes as part of Kaiser Permanente’s Worksite Wellness program. Here I made yummy Chicken Salad with Mango and Apple, as well as a Warm Bulgur Salad with Vegetables. Finally I presented a super-quick method for cooking greens and green vegetables: a steam-sauté method finished with the Mediterranean flavors of lemon, olive oil and pine nuts. In one case I used a gorgeous curly savoy cabbage, and the next time I prepared tender Summer Turnips with Pine Nuts and Lemon.

Finally, I wanted to thank everyone who took the time to check out and comment on the first ever Life Chef Video. There will be more to come, and I would greatly appreciate it if you could forward it to anyone you could think of who would enjoy learning how to prepare healthy and delicious meals (that are easy to make and economical too!).

UPCOMING LIFE CHEF EVENTS
August 21 "Healthy Desserts" @ Warm Springs Institute for Rehabilitation
September 6 "Natural Foods 101" @ Sevananda Natural Foods Coop
October 4 "NF 102: Food as Medicine" @ Sevananda Natural Foods Coop
October 16 "Healthy Holidays" @ Warm Springs Institute for Rehabilitation
October 18
"Shop & Cook: Meal Planning and More" @ Saint Philip AME Church
November 4 "Healthy Cooking" @ Heidelberg USA for Kaiser Permanente
November 15 "Vegetarian Holiday Favorites" @ Sevananda Natural Foods Coop

Miso Soba Noodles with Gingered Shiitakes and Nappa Slaw

I gotta be honest, I'm not to precise on these measurements. It's one of those dishes that I just made because I'm familiar with the ingredients. Adding the measurements is an after thought. They shouldn't be too far off, but if anyone is relying on this to be a precise recipe, you should be forewarned. This is more like home cookin' than science.

People with wheat/gluten sensitivities will appreciate this dish because soba noodles are traditionally made from buckwheat, which despite it’s name, contains no wheat at all. Please read the package carefully to be sure the soba noodles you pick up are made purely from buckwheat and not a blend if you have a wheat allergy.

This is a three step dish, but it can easily be combined into a one-step noodle bowl. All you would change is the presentation.

Miso Soba Noodles with Gingered Shiitakes and Nappa Slaw
Noodles:
1 package soba (buckwheat) noodles
2 Tbsp sesame oil
toasted sesame seeds
1 Tbsp red pepper flake (or to taste)

Mushrooms:
1 pint of shiitake mushrooms, sliced
1 Tbsp red miso
2” piece of ginger, peeled and grated
2 cloves of garlic, minced

Slaw:
½ Nappa cabbage, sliced
2 scallions, sliced
1 red bell pepper, thinly sliced
generous handful each of mint and cilantro, minced
2 Tbsp hydrated hiziki seaweed (soak 1 Tbsp dried in water for 10 minutes and drain)
2 Tbsp sweet rice wine (mirin)
1 Tbsp rice wine vinegar
2 Tbsp dark sesame oil

Cook noodles according to package directions. Drain and toss with red pepper flake, sesame seeds and enough sesame oil to coat thoroughly. Set aside.

In a bowl combine cabbage, scallions, bell peppers, herbs and seaweed. Add the mirin, vinegar and sesame oil and toss the slaw to distribute the flavors. Set aside.

Meanwhile sauté sliced shiitakes over medium high heat with a bit of olive oil, ginger and garlic. Once mushrooms are cooked through add miso and 1-2 Tbsp of water, or just enough water to allow the miso to coat the mushrooms.

To plate the dish, arrange noodles on a platter and top with mushroom mixture. Arrange the slaw in a delicate pile in the center of the platter. Sprinkle the entire dish with a little sesame oil and serve warm or at room temperature.

Summer Turnips Greens with Pine Nuts and Lemon

“Summer turnips” are a variety of turnip greens that are harvested during the warmer months. They tend to be a lighter green, with a thinner texture than “winter turnips.” In this dish, they serve as a great example of a fast, last minute vegetable dish.

This is a VERY forgiving recipe, so have fun playing with your food. Substitute just about any green such as spinach, kale, or mustards, or use asparagus, broccoli or Asian cabbages like dai choy and bok choy. Use slivered almonds, toasted sesame seeds or even crushed peanuts instead of pine nuts. Or drizzle lime juice, soy sauce or sesame oil in at the end instead of lemon juice.

Summer Turnips with Pine Nuts and Lemon
2 bunches young, tender turnip greens, rinsed and chopped
2 scallions, sliced (or ½ a small onion)
3-4 cloves of garlic, minced
juice from 1 lemon, or 2-3 Tbsp or so
2-3 Tbsp pine nuts, toasted
olive oil
salt and pepper to taste

Place garlic and oil into a cold pan and turn on the heat to about medium high. As garlic becomes aromatic (3 minutes or so) add the scallions.

Toss in the hot oil a few turns, then add the greens. The greens should still be damp to help steam them along, if not add about 2 Tbsp of water.

Continue stirring as the greens cook down and season with salt and pepper.

In about 5 minutes the greens should be tender. Add the lemon juice, toss and place into a serving dish.

Top with toasted pine nuts.

Warm Bulgur Salad with Vegetables

Don't have bulgur? Don't sweat it! This dish will work great with just about any grain or rice you can think of: brown rice, couscous, wild rice, quinoa, the sky's the limit!

Warm Bulgur Salad with Vegetables
1 ½ cups buglur (should be 3 cups once cooked)
2 yellow squash, diced
2 zucchini, diced
1 pint grape tomatoes
¼ cup good quality cold pressed extra virgin olive oil
2 Tbs fresh thyme
4 cloves garlic, diced
¼ cup feta cheese (basil & sundried tomato flavor)
½ bunch fresh parsley, chopped
2 scallions, thinly sliced
juice from 2 lemons
salt and black pepper


Cook buglur by seasoning 3 cups of water with salt and bringing it to a boil. Stir in uncooked bulgur, reduce heat to medium and cover. Let simmer for 10 minutes, then reduce heat to low and continue cooking for about another 10 minutes. Fluff with a fork and set aside.

Meanwhile, combine olive oil, tomatoes, thyme and garlic in a small sauce pot. Bring up to a simmer, stirring to ensure even cooking of the tomatoes. Season with salt and black pepper and cook until tomatoes are tender but are not breaking apart. Drain off excess oil and set tomatoes aside.

Heat a pan over medium-high heat with 1-2 Tbs of olive oil. Add squash and zucchini, in batches if need be, to sear then sauté until just tender. Season with salt and black pepper and set aside.

Compose the salad in a large bowl. Add the fluffed bulgur, zucchini and squash, tomtoes, parsley, scallions and lemon juice. Toss to combine ingredients and top with crumbled feta cheese. Serve warm or room temperature.

Salmon BLT Wrap

No need to waste leftover salmon when you can make this quick and easy lunch wrap.

Salmon BLT Wrap
Spinach or Tomato wraps
1/2 cooked salmon, flaked
2 strips of cooked bacon
2 slices tomato
shredded lettuce
1 Tbsp ranch dressing

Arrange ingredients on the center 1/3 of a large wrap or tortilla. Roll, wrap and refrigerate until ready to eat, or slice in half on a bias and enjoy. For finger foods, slice into rounds and secure with a toothpick.

Mediterranean Tuna Wrap

Give boring tuna salad a makeover with fresh vegetables and Mediterranean flavors.

Mediterranean Tuna Wrap
2-4 Wraps or tortillas, multigrain, tomato or spinach varieties
1 can tuna in water, drained
2-3 slices of tomato, or a handful of grape tomatoes cut in half
1 Tbs capers, drained
Handful of parsley, chopped
2 Tbs lemon juice
1/2 cucumber, sliced
1/4 red pepper, diced, or 2 Tbs jarred diced red pepper
2 Tbsp red wine vinaigrette (or Italian or Greek dressing)

Combine all ingredients except wraps, mixing well. Place 1/4-1/2 cup of filling (depending on the size of the wrap) in the center 1/3 of the wrap. Roll, wraps in plastic wrap or foil and refrigerate, or slice in half on a bias or slice into rounds for "finger food."

Pizza Wraps

Have great pizza flavor in only minutes without mystery additives and preservatives.

Pizza Wraps
Tomato wraps or tortillas
Spaghetti or pizza sauce
sliced pepperoni (or any of your favorite pizza toppings)
shredded mozzarella cheese or cheese slices

Preheat broiler of the oven. On a baking pan, lay out wraps being sure not to over lap. Spread about 2 tablespoons of red sauce on each wrap, concentrating primarily on the center. Top with cheese and pepperoni, or pizza toppings. Place pan under the broiler for about 2-3 minutes or until cheese melts. Remove from oven and carefully roll up each wrap. Allow to cool slightly, then slice into rounds. You may skewer rounds with toothpicks to secure them. Serve immediately.

Strawberry Kiwi Wrap

Breakfast, lunch or snack time, this wrap is a hit!

Strawberry Kiwi Wrap
1-2 multigrain wrap or tortilla
3 Tbs whipped (spreadable) cream cheese
1/4 cup sliced strawberries
1/4 cup kiwi, peeled and diced
sliced almonds
a few sprigs of fresh mint, thinly sliced

Spread whipped cream onto the center 1/3 of a multigrain wrap. Top with fruit, almonds and mint. Roll the wrap, wrap in plastic or foil and refrigerate. To serve. Slice in half on a bias or slice into rounds for "finger food" and remove foil or plastic wrap.

Curry Chicken Salad with Mango, Apples and Curry Yogurt Dressing

This chicken salad is an excellent use of leftover chicken. In a rush? Pick up a precooked rotisserie chicken from your local market.

Curry Chicken Salad with Mango, Apples and Curry Yogurt Dressing


3 cups cooked chicken, diced
1 apple, diced
2 mangoes, peeled and diced
1 8 oz container of plain yogurt
2 Tbsp yellow curry powder
1 handful fresh parsley, minced
1/2 cup slivered almonds or toasted pecan pieces


Place curry and yogurt into a small bowl for the dressing.
In a large bowl combine the remaining ingredients. Stir in the curry-yogurt dressing and serve atop greens or use for the filling for a wrap.

Wednesday, August 13, 2008

Life Chef Video

Hey look over there on the left side! What's that? It's a new Life Chef video! How exciting is that? Somebody call the Food Network!

Please take the time to click on the image and check out my first ever video featuring the ever-popular Life Chef recipe of Curry Chickpeas with Kale (or spinach or turnips, or whatever green you like). The recipe is at the end and don't forget to read the credits. The kids and M were my crew! Awesome.

I have a ton of recipes to post from the 4th Annual Wellness Fair at Saint Philip AME Church where I was also honored during the 25th Annual Awards Breakfast by the Health Ministry. So those recipes along with the recipes from our cooking demo at Piedmont National Corp yesterday will be up by the end of the week.

We're shooting new Life Chef vids as we speak, so stay tuned!

Sunday, July 27, 2008

Recent Recipes and Upcoming Classes

If you haven't made it out to a Life Chef cooking class or demo recently you've missed out on some great food, fantastic people, and healthy eating. Here are links to recent recipes and at the end I've listed upcoming classes so you don't have to miss out!

I had a fun time on July 26 at the National Black Arts Festival's Art of Healthy Cooking Pavilion and I want to thank everyone who stopped by to sample the Jerk BBQ Chicken and the Red Cabbage and Apple Slaw. If you're looking for the recipes, click the links to find out more.

Also for the folks who joined me on July 19 at the "Gorgeous Summer Produce" class at Saint Philip AME Church, I wanted to put up the recipe for the Stuffed Zucchini Shells which were so yummy. Also here are the links for the Simple Summer Mixed Pepper Medley, which was originated during the July 12 class at Sevananda Natural Foods Co-op.

After a beautiful drive down to Warm Springs Georgia, a held a class with the fantastic crew of the Post Polio Support Group at the Roosevelt Warm Springs Institute for Rehabilitation. What a gorgeous place! I held a class that focused on anti-inflammatory foods and we used ginger, a natural anti-inflammatory in just about every dish! Where here's the Blueberry and Melon Salad recipe, as well as the Ginger Garlic Kale with Portabellas. I'll get that Ginger Lime Glaze that we used on the salmon up soon, as well as that super easy (and super yummy) ginger syrup for the ice cream.

UPCOMING CLASSES
August 2 "Natural Food for Connoisseurs" @ Sevananda Natural Foods Co-op in Little Five Points
August 9 @ the Saint Philip AME Church Annual Wellness Fair
August 12 "Healthy Cooking" @ Piedmont National for Kaiser Permanente
August 14 "Food as Medicine" @ Henry County's Heritage Park for Kaiser Permanente
August 21 "Healthy Desserts" @ the Warm Springs Institute for Rehabilitation
September 6 "Natural Foods 101" @ Sevananda Natural Foods Co-Op
September 13 "Shop & Cook/Meal Planning" @ Saint Philip AME Church

Monday, July 14, 2008

Sesame Green Beans


Sesame Green Beans
1 1/2 # fresh green beans, trimmed
1 Tbsp sesame oil
2 Tbsp Miso Tamari or light soy sauce
1 tsp agave nectar or honey1/4 tsp crushed red pepper
2 tsp toasted sesame seeds

1. Simmer green beans in unsalted water for 7-10 minutes or until bright green and just tender.
2. Drain off water and return green beans to the pan over medium-high heat. Add sesame oil, miso tamari, gave nectar and crushed red pepper and toss or stir well to combine.
3. Cook for 3-4 minutes or until the sauce begins to form a light glaze or slightly thicken.
4. Transfer to a serving dish and top with toasted sesame seeds.

Pineapple Ginger Ice Cream Smoothies


Feeling a bit sore after mowing the lawn? Here's a cool treat that could help those achy joints with the healing properties of pineapple and ginger.

Beat the heat by adding some vanilla ice cream, yogurt or non-dairy frozen dessert to make this smoothie with the anti-inflammatory properties of ginger and pineapple. Click the links to read more about the health benefits ginger and pineapple according to the World's Healthiest Foods site.

Pineapple Ginger Ice Cream Smoothies
2 cups vanilla ice cream (or yogurt or non-dairy frozen dessert)
2" piece of ginger, peeled and grated
6 oz of pineapple, chopped (if using canned pineapple, use the juice as well)
1 tbsp agave nectar or honey (optional)

Place pineapple and ginger in a blender and pulse to combine. Add ice cream and agave nectar and blend until smooth. Pour into glasses and serve immediately.

Stuffed Zucchini Shells

If you've planted zucchini you've probably found yourself in the situation of giving zucchini away to friends, co-workers or even strangers on the street. In the right conditions, zucchini plants can be very prolific.

Here is a simple all-in-one meal to help you use up some of this summery squash. You can easily use tofu crumbles or ground turkey, or any protein you like to make these zucchini shells a complete meal, or a hearty side dish or first course.

Don't forget the simple accompaniment of minted yogurt for an elegant finishing touch.

Stuffed Zucchini Shells
4 medium zucchini, sliced in half lengthwise
12 oz ground turkey or tofu crumbles
2 cloves garlic, minced
1 tsp garam masala
1/2 tsp cinnamon
1" piece of ginger, peeled and grated
1/4 tsp cumin
1/4 tsp cayenne pepper
1/2 tsp turbinado or light brown sugar
3 scallions (green onions) sliced, greens and whites separated
2 Tbsp toasted pine nuts
salt and pepper

* Scoop out the seeds and part of the flesh of the zucchini. Chop the flesh and set aside.
* Heat 2 Tbsp of oil in a pan over medium-high heat and saute the turkey with the white parts of the onions and the garlic, stirring until the meat is no longer pink. Drain off excess fat.
* Stir in the zucchini flesh, the spices, and the green onions and continue cooking for about 5 more minutes.
* Place zucchini "shells" cut side up on a baking sheet lined with foil. Fill the zucchini "shells" with equal portions of the meat mixture, and top with pine nuts.
* Cover with foil and bake in a 350 degree oven for 30-45 minutes or until the zucchini "shells" are tender.

To serve, top each shell with a drizzle of minted yogurt or sour cream.

Blueberry Melon Salad


Not only is this salad crisp and refreshing, but it's a beautiful example of the many colors of summer fruits. I used locally grown blueberries and yellow fleshed watermelon, but feel free to use any berries and melons that catch your eye.

Blueberry Melon Salad
1 cup blueberries
1/2 cup raspberries
1 cup yellow watermelon, cubed
1 cup galia melon, cubed (or cantaloupe or honeydew)
1 head green leaf lettuce, torn
2 Tbsp agave nectar (or honey)
1 Tbsp white wine vinegar
1 Tbsp sesame seeds

Arrange the lettuce on a platter or in a bowl and top with the fruits. Drizzle with agave nectar and white wine vinegar. Toss and allow to sit for a few minutes to allow the flavors to meld. Just prior to serving, toss gently and top with sesame seeds.

Sunday, July 13, 2008

Garlic Ginger Kale with Portabella Mushrooms


(photo from growingpower.org)

This dish was made with the Georgia grown Coleman River Farm's Lacinata Kale (also known as Black Kale or Dinosaur Kale), and came together in mere minutes. Loaded with vitamins, minerals and antioxidants, this is a fantastic side dish, or even a main course to whip together and enjoy.

Garlic Ginger Kale with Portabella Mushrooms
2" piece of ginger, peeled and grated
4 cloves garlic, minced
1# kale leaves, trimmed and roughly chopped
2 large Portabella caps, cubed
1/2 red onion, thinly sliced
1 tsp crushed red pepper
1 Tbsp miso tamari (or low sodium soy sauce)
1 Tbsp olive oil

Heat olive oil in a pan over medium-high heat.
Rinse and drain kale, leaving the leaves wet.
Add onions to the pan and cook until wilted, add all of the remaining ingredients, stirring well to distribute. The moisture on the kale leaves will cause a "steam-saute" effect. Cover if desired and cook for 10 minutes or until leaves are tender.

Simple Summer Mixed Pepper Medley


Substitute any of your favorite peppers to increase or decrease the spiciness of this condiment/side dish. It's loaded with flavor and antioxidants, and the short cook time makes this a fabulous condiment for fish, chicken, tofu or whole grains.

Simple Summer Mixed Pepper Medley
2 banana peppers, seeded and large diced
1 red bell pepper, seeded and large diced
1/2 fennel bulb, small dice
1/2 red onion, thinly sliced
2 cloves garlic, minced
1 Tbsp olive oil
salt and pepper to taste


Add olive oil to a pan over medium-high heat and saute red onions until slightly caramelized. Add the remaining ingredients and continue to cook for 5-8 minutes or until just crisp-tender -- cook longer to stew down. Use as a condiment to top proteins, or incorporate into side dishes featuring whole grains or pastas.

"Food as Medicine" Recap

In the last Food as Medicine class held July 12 at Sevananda Natural Food Co-Op, we looked into Antioxidants and their role in an "anti-inflammatory diet." We shared an eye-opening revelation about the simplicity of healthful eating, and how many of the foods we eat daily contribute to our well being by acting as a buffer between ourselves and the toxins that invade our lives via biological, environmental and artificial stimuli.

Woah that's a mouthful, but it was all quite simply explained in class, then highlighted by these easy yet delicious dishes: Garlic-Ginger Kale with Portabella Mushrooms, Blueberry Melon Salad and a Simple Summer Mixed Pepper Medley.

The Blueberry Melon Salad not only highlighted the seasonal Georgia-grown blueberries, but also illuminated beautiful native Yellow-fleshed Watermelon and succulent Galia Melons with a touch of mint on a bed of tender organic green leaf lettuce, with a simple dressing of agave nectar and white wine vinegar.

The Garlic Ginger Kale with Portabella Mushrooms featured local Coleman River Farm's young and tender Lacinata Kale, also known as Black Kale or Kavolo Nero. Kale is packed with antioxidants, vitamins and minerals. This dish also packs loads of ginger and garlic shoot the antioxidant and anti-inflammatory properties through the roof! Mushrooms carry mysterious properties that centuries of preparation have proven to bolster the body, mind and soul. This dish simply and quickly combines fantastic health promoting antioxidants and delicious Georgia grown tender kale leaves with the mystical, magical life-enhancing mushrooms to produce one tasty dish in a matter of minutes.

The Simple Summer Mixed Pepper Medley is one of those amazing dishes that can be altered in innumerable ways. I hope you're growing peppers of some sort at home in your yard or in a pot on the deck. Peppers love Georgia's climate and if you are growing them, then you'll find yourself up to your neck in peppers in very short order. This is a great dish, which with the addition herbs and spices, or complimentary ingredients such as tomatoes, white wine or even a pat of butter, can be transformed into a quick sauce for fish, tofu, brown rice or really anything. Feel free to add crushed red peppers, garlic, a splash of balsamic vinegar or whatever you fancy to modify this recipe to your tastes.

Sunday, July 6, 2008

Even more blueberries!

Check out the Blueberry Balsamic Vinaigrette that dressed a wonderful Crunchy Blueberry Salad at the last Natural Foods 101 Class! This link will take you to EatLocalAmerica.coop where Localvores do their darnedest to support locally produced foodstuffs, like our Georgia grown blueberries.

The next class, Food as Medicine, will be held at Sevananda on July 12 from 10 a.m. to noon. The class is free for Sevananda employees, and the first THREE members to sign up. It's $10 for everyone else.

If you can't make that class, I'll be focusing on Gorgeous Summer Produce, locally grown, to produce healthful and delicious dishes at the next Life Chef class held at Saint Philip AME Church on July 19 from 10 a.m. to noon. This class is $15 per person, or $5 for seniors.

Thursday, July 3, 2008

Blueberry Popsicles and More


July is peak blueberry season here in Georgia. Get yours while they last! Pick them up from local growers at weekly farmers' markets, or from stores like Sevananda Natural Foods Co-Op. Or pack up the kids and go pick your own from farms around the state. Keep reading for helpful links and more nutritional information about blueberries!

This blueberry popsicle recipe from Wondertime is quick and easy and a great use of the gorgeous blueberries that are in peak season now. Freeze the popsicles for 3-4 hours.

For more info on the intense nutritional benefits of blueberries, check out this article from The Worlds Healthiest Foods website.

To find a farm where you can pick your own berries visit Where to Pick Your Own.

Georgia is the 7th leading blueberry grower in the nation and for more great info on our local harvests of Rabbiteye blueberries visit the UGA College of Agriculture & Environmental Sciences.

If you want to grow your own blueberries take this advise from the UGA CAES article:
"Under good management, blueberry bushes will produce some fruit the second or third year after transplanting. By the sixth year they will yield as much as 2 gallons each. The yield will continue to increase for several years as the plants get larger."

Friday, June 27, 2008

Is Grilling Safe?

I love to grill. In our house, we grill OUTDOORS year round, regardless of the weather.

Lately there's been a lot of focus on how this fat-free cooking method may actually be harmful due to the presence of cancer-causing chemicals known as HHAs and HCAs. These chemicals are produced by 1) charring and burning which turns meat from something edible to something yucky, and 2)flare ups, as fats drip down onto the coals, the coals release toxic fumes. Charring, burning and flare ups are usually due to "poor grilling techniques," if you will.

If you take the time to properly prepare meats (trim fat and use marinades to keep meat moist) and your grill (be sure coals have cooked off and cook over medium-medium high heats on a clean grill), and stay present and in the moment (and most importantly WITH your grill so that you can immediately extinguish flare ups), you can probably eliminate most of these issues. Also consider grilling something other than meat, or grilling thin cuts that take less time to cook.

Always pair lots of nutrient rich and antioxidant foods (like this Red Cabbage, Fennel, Apple Slaw) and beverages (like this Pomegranate Mint Spritzer) with your grilled meals to help tip the scale in your favor -- both literally and figuratively.

There's a good article on the Real Age website. So be sure to give it a quick look-see.

Happy Grilling!

Monday, June 23, 2008

Natrual Foods 101 Class this Saturday


NEXT LIFE CHEF CLASS...
This Saturday, June 29, learn the ins and outs of natural foods and one of Atlanta’s oldest Natural Food Co-Ops, Sevananda.

Life Chef, Asata Reid will guide you through Natural Foods 101 where you learn about the community and social priciples of Sevananda which has been cooperatively owned since 1974. The class will also familiarize you with some of the amazing organic, local and fairtrade products that the store carries.

The class will be held in the Education Room from 10 a.m. to noon.

For more information call Sevananda at 404-681-2831

*******************************************************
WHAT'D I MISS?


THANK YOU to everyone who came out to my Chef Demo at the Green Market at Piedmont Park, presented by Kaiser Permanente. Was that fun or what? Now I hope some of you went straight home and lit your grills, or at least stopped and picked up some fresh produce for those salads. Yum!
If you're looking for the recipes, just click over to the left the month of June. Let me know how those turn out for you!

*******************************************************
COMING UP...
On Saturday, July 5th -- Don't miss the grand opening of Aerobics, Yoga & More Fitness and Dance Studios owned by fitness guru Althea Lawton-Thompson of Altheatized and Lifeline Fitness Consulting.

During this day-long celebration Life Chef Asata Reid will host two food demos focusing on building energy. Have a mid-morning powerboosting snack and then stick around to grab so healthy lunch-on-the go ideas around noon. Fitness, dance and exersize demonstrations will take place all day long to give you a full spectrum of life-enhancing classes and services that AYM Fitness and Dance Studios have to offer.

AYM Fitness and Dance Studios is located at 4051 Stone Mountain Hwy, Suite G101B in Lilburn, GA 30047 in the Publix Shopping Plaza at the intersection of Hwy 78 & Killian Hill Road. For more info call 770.921.5424.

Also worthy of note is that YOUTH will find a plethora of activities during the AYM Youth Summer Camps! If you want to keep your kids active and entertained check out this blurb and sign them up today!
AYM summer camps are small group learning sessions held in our brand new air-conditioned fitness anddance studios. Healthy lunches from Subway will be provided each day in addition to bottled water (excluding Art Camp). Camp leaders are college-educated professionals with experience teaching in each area. Your childwill be mentally and physically stimulated and challenged while making new friends at AYM Summer Camp. Register early – only 18 slots exist for each camp.

KidFit Camp: The creators of the Johns Hopkins’ Hospital Youth Obesity fitness program have designed a5-day fun fitness camp for children aged 8-12. Activities include team drills, Wii fitness games, boxing andsports games. This program focuses on improving muscle control and strength, weight management,flexibility, balance and body image.

Dance Camp: Get ready for a fun-filled week of dance! Daily sessions include one-hour classes in Jazz,Hip-Hop, Creative Movement and Stomp. Participants will learn technique as well as a performance to showfamily and friends on the Friday of each week of camp.

Art Camp: This 5-day camp has a different theme for each day. Children will create ARTifacts fromrecyclable items like foil, aluminum cans and glass on Trash-to-Treasure day. The excitement of pirates onthe high seas will come true when kids make treasure chests for their handcrafted jewelry on Treasure Islandday. Other days include Sew No More and Animals, Animals, Animals. Your child will have something new andunique to bring home every day. You’re welcome to view the Art Exhibit on the last day of camp

Lychee Gingerale


All natural gingerales like Red Rock, or Ginger Beers like these come with lots of gingery bite, which is wonderful in a cold beverage on a hot summer day. Pair these gingery beverages with some wonderful lychee nectar, available at most natural foods markets, and you have a fast, fabulous base for a cocktail, or a lovely refreshing drink all by itself.

Personally I find both ginger beer and lychee nectar kind of sweet so I throw some sparkling water in the mix to "cut it" if you will.

Give it a whirl and let me know what you think.

Lychee Gingerale
12 oz of ginger beer
12 oz lychee nectar
12 oz of sparkling water


Combine, stir and serve over ice!